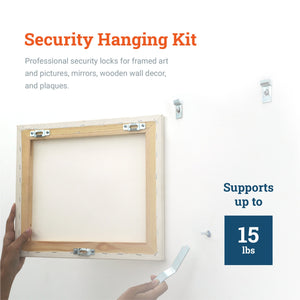
About Security Kit Lock-In Wood Frame
- Secure multi-point picture locking system
- Lock-In Security Hangers attach pictures to the wall at both the bottom and the top rails of a frame. This multipoint locking system provides extra security
- For Frames up to 24" wide
- One set supports up to 15 pounds (if your item is heavier look at Security Cleats)
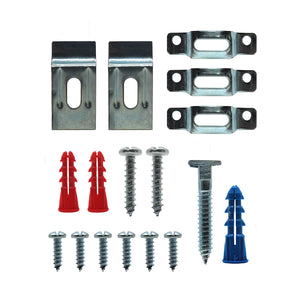
Security Wood Frame Kit includes
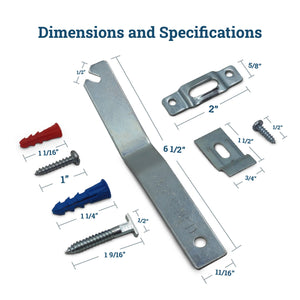
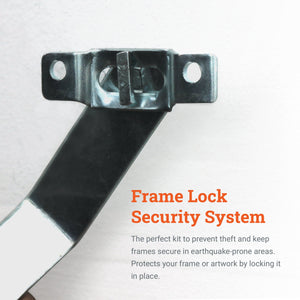
- (2) 3/4" x 1 1/2" wall brackets - to attach to the wall
- (2) #10 x 1" screws - to attach the wall brackets to wall
- (2) red or white wall bracket plastic anchors - if needed to attach wall brackets to wall
- (1) 1 3/4" T-Head screw - goes in-wall and locks frame to wall by attaching to the mounting plate on the frame
- (1) Security Screw plastic anchor - to attach security screw to wall
- (3) 5/8" x 2" mounting plates - two go on the top of the wood frame to hang on the wall brackets and one attaches to wood frame for T-head screw to lock into
- (6) #6 x 1/2" screws - to attach the three mounting plates to the back of the wood frame
Description
Any reasonably handy person can install Security Hangers. The first picture you tackle will probably take some time, but once the installation sequence is understood, hanging speed will increase.
A basic instruction sheet is included with each shipment of Lock-In Hangers. Or, if you prefer, refer to our step-by-step Lock-In Hangers installation on the Instructions Tab above.
Mounting Plates
If you look closely, you will see that Lock-In Mounting Plates (used on the backside of wood frames) are slightly asymmetrical: the two screw holes are positioned a little off-center and the long edge on one side sticks out a little more than the opposite edge (image here). The asymmetric design gives the Mounting Plates a bit more leeway when installed on narrow wood frames. Apart from this consideration, Mounting Plates have no up or down edge--they can be oriented either way to accept wall hardware.
Another often overlooked feature of wood frame Lock-In Mounting Plates is the two small raised bumps on either side of the slot opening. In theory, you can use these bumps to mark the position of the plate on the wall by tapping on the face of the frame bottom rail. In practice, the Mounting Plate bumps usually do not make enough of an indentation on the wall surface to make this feature consistently useful.
Narrow Frames
If you are using Lock-In Security Hangers on a narrow (thin) wood frame with a long horizontal span, make sure that the frame is adequately braced internally so that the frame will remain rigid under load.
The minimum frame width required for Lock-In mounting plates to be safely attached to a wood frame is 3/4."
Instructions
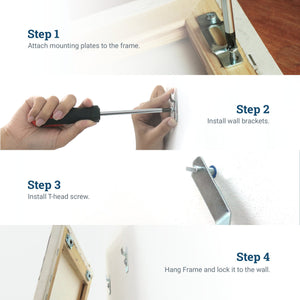
- Place the frame face-down on a soft surface.
- Attach two of the slotted mounting plates to the back side of the frame, about 2" in from each outside edge and slightly down from the top edge, using the 1/2" screws provided. Screw holes should be pre-drilled to avoid splitting the wood.
- For small to medium size wood frames, attach the third slotted mounting plate to the back side of the frame at the center of the bottom rail, slightly in from the outside edge. Again, screw holes should be pre-drilled to avoid splitting the wood. Measure from the outside edge of the frame's bottom rail to the center (top to bottom) of the slot in the mounting plate. Write down this measurement.
- For larger wood frames, an extra (fourth) mounting plate should be used on the frame's bottom rail to make the frame more stable. Extra mounting plates must be ordered separately On larger frames, space the two bottom rail mounting plates an appropriate distance apart, slightly in from the outside edge of the bottom rail. (If an extra mounting plate is used, expand Steps 11-15 below accordingly). Measure from the outside edge of the frame's bottom rail to the center (top to bottom) of the slot in the mounting plates. Write down this measurement.
- Mark the desired position of the top edge of the frame on the wall.
- Measure the distance between the centers of the two top rail mounting plates.
- Level and drill two 1/4" dia. holes in the wall about 1 1/4" down from where you want the top edge of the frame to be and spaced apart at the distance measured in Step 6. (A 1/4" dia. hole is usually sufficient for drywall--for harder surfaces or if the plastic anchors start to deform when hammering them in during Step 8, re-drill using a 5/16" drill bit). It is very important that these two holes be as level on the wall as possible.
- Attach the two wall brackets at these holes so that the flanged ends of the brackets face up and away from the wall, using the 1" screws and (red or white) plastic anchors provided. Do not over-tighten the screws.
- Hang the frame on the wall brackets so that the upper flanged ends of the wall brackets are seated snugly behind the top rail mounting plates on the frame.
- Check for level. If the frame is not quite level, small adjustments are possible by removing the frame from the wall, loosening the wall bracket screws slightly, shifting the brackets up or down as needed in their slots, retightening the screws, and replacing the frame on the brackets.
- With the frame hung on the wall brackets, lightly pencil-mark the position of the frame outside edge on the wall at the center (left to right) of where the mounting plate is located on the bottom rail of the frame.
- Remove the frame from the wall.
- Transfer the measurement made in Step 3 or 4 to the wall, making a second pencil mark up from the one made in Step 11. Erase the bottom mark.
- Drill a 5/16" dia. hole at the pencil mark made in Step 13 and gently hammer the (blue) T-Head plastic anchor provided into the drilled hole until it is just flush with the wall surface.
- Thread the T-Head screw provided into the plastic anchor until about 3/8" extends out from the wall surface. Start the T-Head screw first by hand and complete using a Security Wrench. Align the head to a final horizontal position.
- Again hang the frame on the wall brackets. The T-Head screw just installed should fall inside the slot of the mounting plate on the back of the bottom rail.
- From the right-hand side, slide the Security Wrench up underneath the bottom edge of the frame and, without lifting the frame away from the wall, engage and rotate the T-Head screw clockwise one-quarter turn to a vertical position. The frame is now locked to the wall.